PowerPoint Slide Master: Full Tutorial, Video, and Sample Files
In this tutorial, you’ll learn how to use the Slide Master in PowerPoint, why it’s useful, and how to use it to create elements that appear on every slide in the presentation, such as company logos and slide numbers.
PowerPoint Slide Master: Full Tutorial, Video, and Sample Files
The PowerPoint Slide Master is useful for creating templates in presentations and repeating specific elements on each slide.
For example, if you want to repeat your company logo, the date, or the client’s name in the bottom-left corner of each slide, you can do that with the Slide Master.
You can also use it to set the default colors, fonts, and other design elements and ensure that everything on your slides looks consistent.
In this tutorial (video above and written version below), you’ll learn why the Slide Master is useful, how to set it up, and how to use it to insert logos, headers, and footers in presentations.
Video Table of Contents:
0:52: Slide Master 101
11:24: Slide Master Setup
14:35: Exercise: Fix the First Layout Slide
24:31: Recap and Summary
[Click the “Files & Resources” tab to get all the PowerPoint files for this lesson.]

-
Become a presentation machine
Master the key shortcuts and commands for “warp speed” slide creation
-
Acquire the skills with dozens of practice exercises
Learn by doing – and check your work against the solutions
-
Save hours with our full macro package (25+ macros)
Automate formatting, tables, alignment, drawing guides, and more
The PowerPoint Slide Master: Why It’s Useful
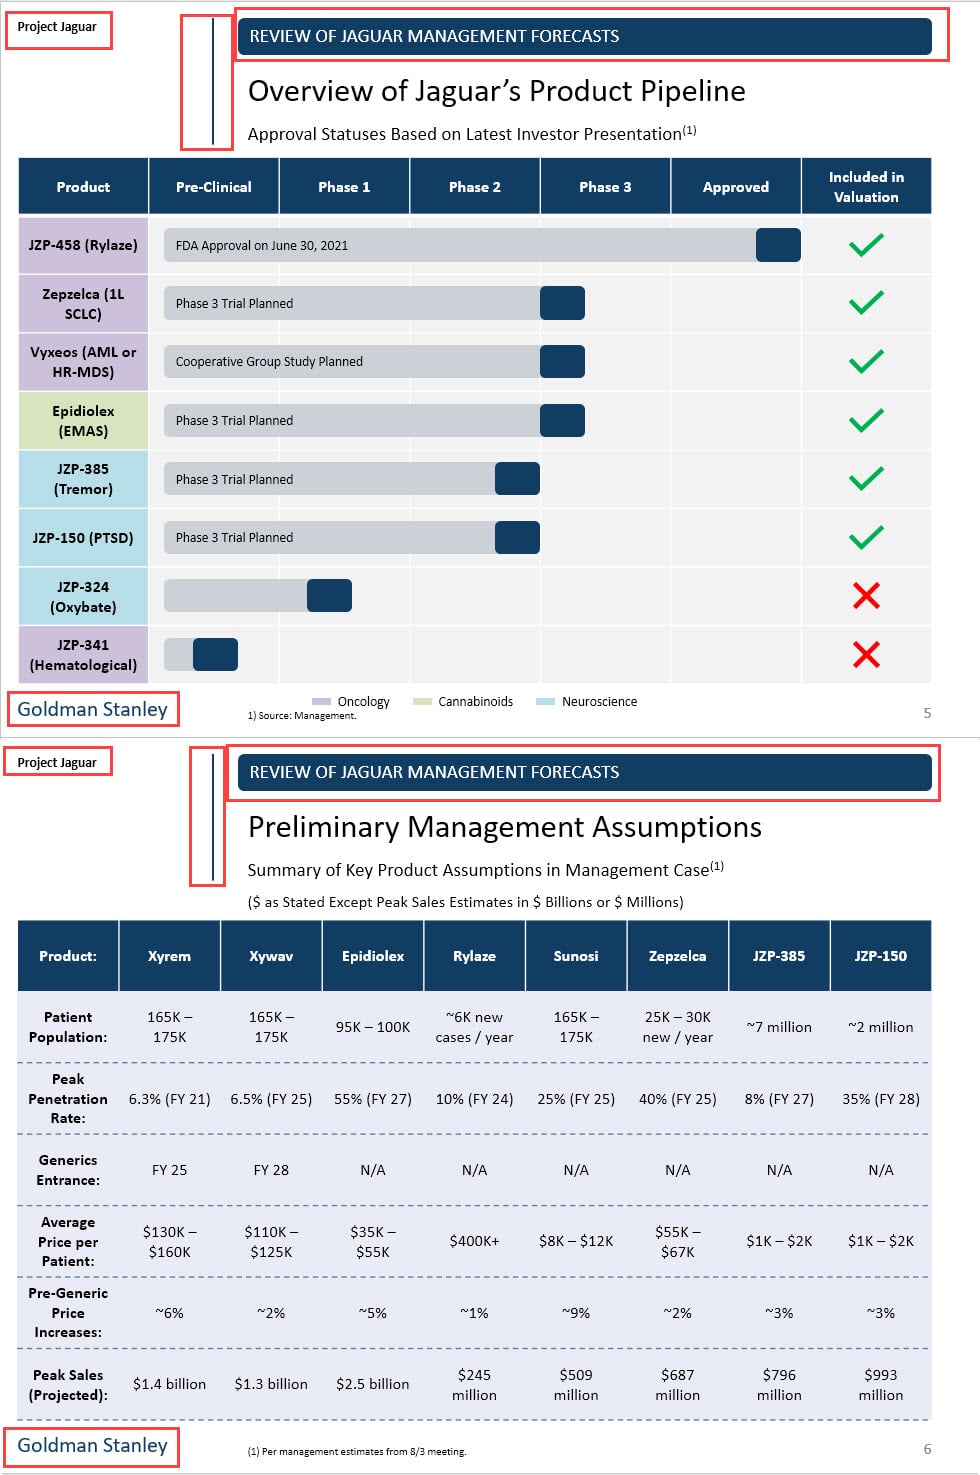
To understand the value of the Slide Master, consider several of the slides in the “Before” file here:
As shown above, these slides have common elements: the divider line next to the title at the top, the “Goldman Stanley” logo in the bottom left, and the “Project Jaguar” text in the top left.
However, we manually inserted these elements on each slide, which is not ideal.
For example, what happens if something changes in the design? What if we need to replace the logo everywhere? Or what if we swap the positions of the logo and the project name?
We would have to go through each slide and manually change the positions and formatting of these elements.
If there are only 5-10 slides, that’s not a big deal, but with 50 or 100 slides, it would be extremely time-consuming to do this.
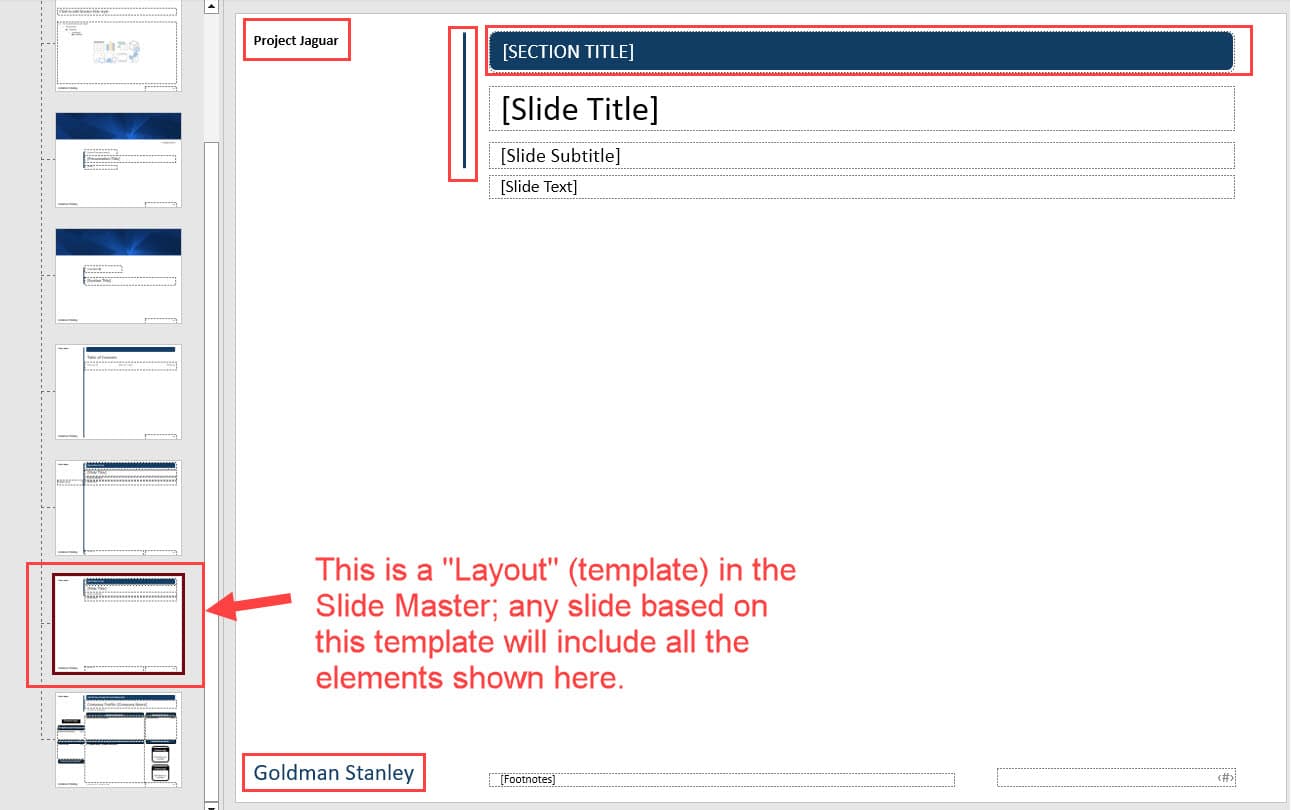
A better solution is to open the Slide Master (Alt, W, M on PC or ⌘ + Opt + 1 on Mac) and insert these common elements on a “Layout” (template) so they repeat across all the slides in the presentation that use this particular Layout:
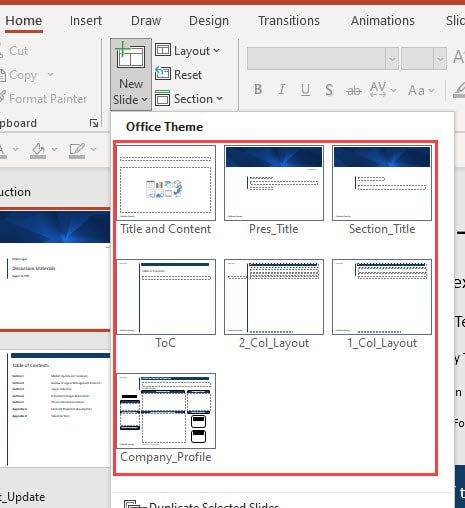
When you insert a normal slide in the standard view of PowerPoint (Alt, H, I on PC), you can base the slide on one of these “Layouts”:
The PowerPoint Slide Master: Key Shortcuts
The key shortcuts are as follows:
Slide Master View: Alt, W, M (PC) / ⌘ + Opt + 1 (Mac)
Close Slide Master: Alt, M, C (PC) / ⌘ + 1 (Mac)
Normal Edit Mode: Alt, W, L (PC) / ⌘ + 1 (Mac)
Move to Next or Previous Layout: Arrow Keys (PC and Mac)
Change Slide Layout (outside of the Slide Master): Alt, H, L (PC) / N/A on Mac
Reset Slide Layout (outside of the Slide Master): Alt, H, Q (PC) / N/A on Mac
Header & Footer (outside of the Slide Master): Alt, N, H (PC) / N/A on Mac
NOTE: The “,” in these shortcuts means that you press and release each button sequentially. The “+” means that you press and hold down each button and then release them all at the end.
For example, with Alt, W, M, you press and release Alt, press and release W, and press and release M.
But with ⌘ + Opt + 1 (Mac), you press and hold ⌘, press and hold opt, and press and hold 1 and then release all 3 keys at once.
You will enter and exit the Slide Master all the time in longer presentations, so you should know at least the first few shortcuts above.
The PowerPoint Slide Master: Placeholders vs. Shapes
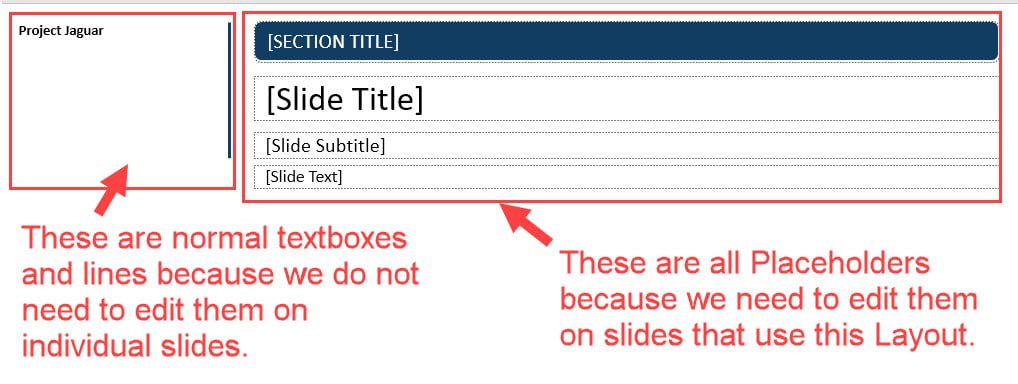
When you’re on a Layout in the Slide Master, you can insert shapes, lines, and textboxes.
However, if you insert these objects within the Slide Master, you will not be able to edit them on normal slides that use the Layout.
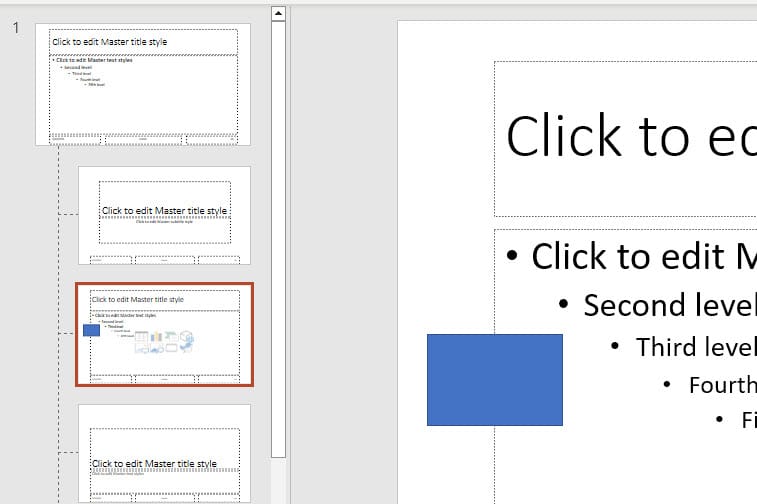
Let’s look at a simple example, where we add a rectangle shape to the default “Title and Content” Layout in the Slide Master:
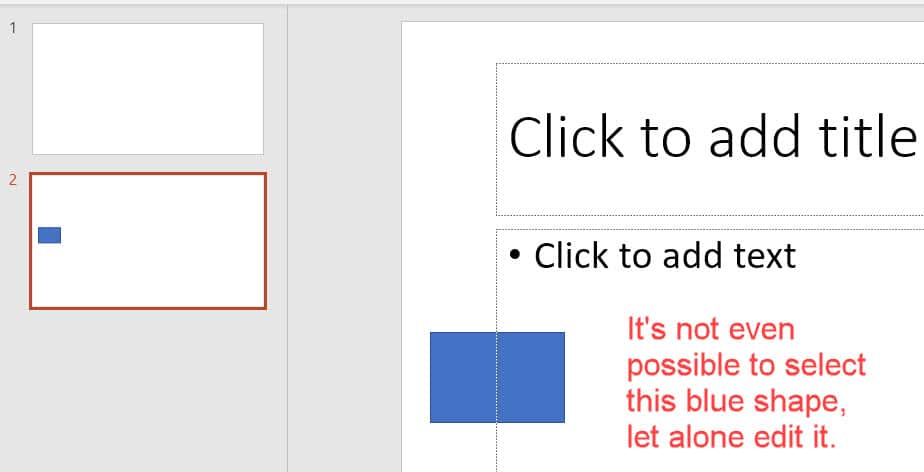
If we now return to the normal slides with Alt, W, L (⌘ + 1 on Mac) and insert a new slide that uses this “Title and Content” layout, it’s impossible to select or edit the shape:
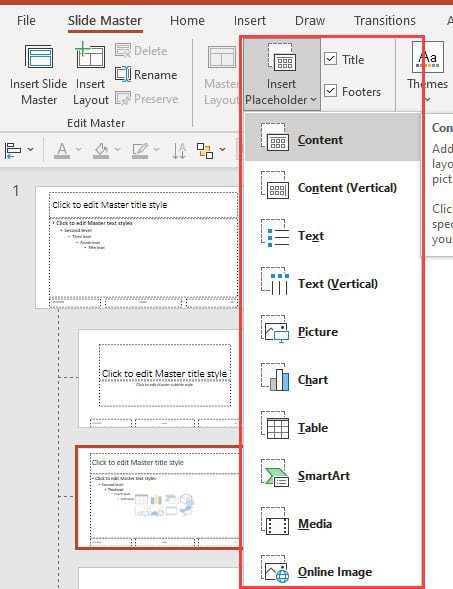
To edit this shape, we need to return to the Slide Master and insert a Placeholder on this layout, which is in the “Slide Master” tab under “Insert Placeholder”:
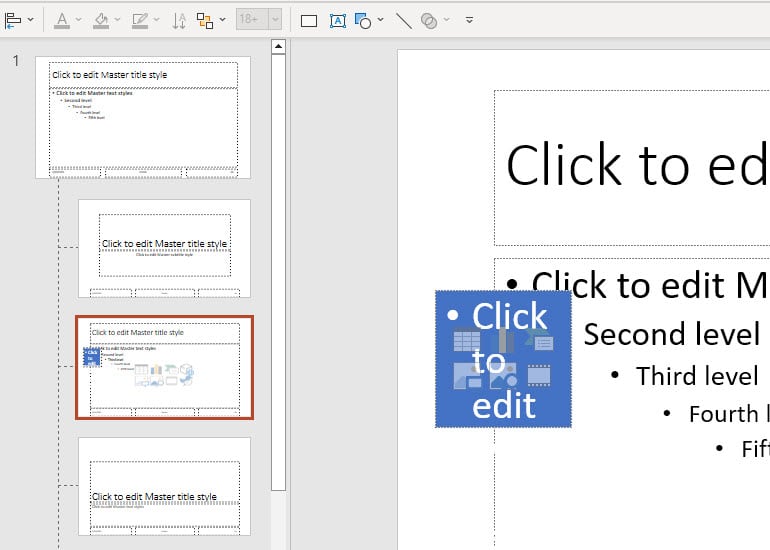
We can insert a “Content” Placeholder here and then format it with the same fill color, font color, and other attributes:
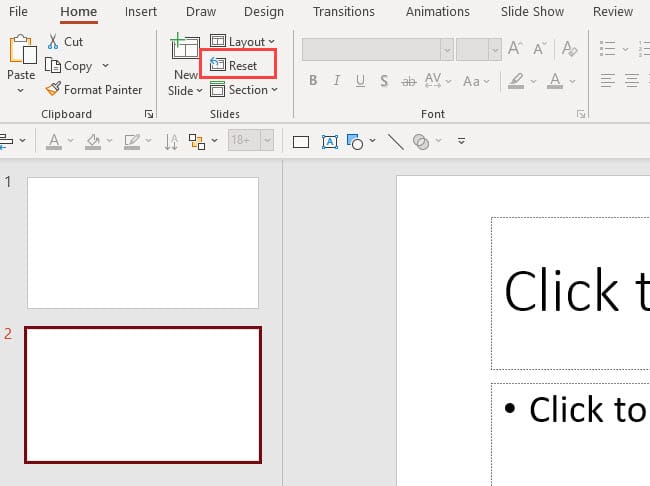
Then, when we return to the normal slide view and reset the Layout of the slide we just inserted, the blue shape is now editable:
In real life, you would not use Placeholders for something trivial like this – you would normally use them for slide titles or blocks of text that change on each slide:
You need to consider the Shape vs. Placeholder distinction before using the Slide Master, or your templates will not work correctly.
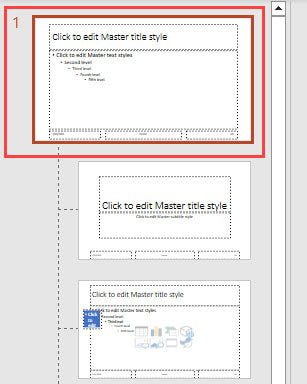
Finally, note that Placeholders are not allowed on “Layout #1” in the Slide Master – the one that looks like this:
This Layout determines the default font and paragraph styles for all the other slides and Layouts.
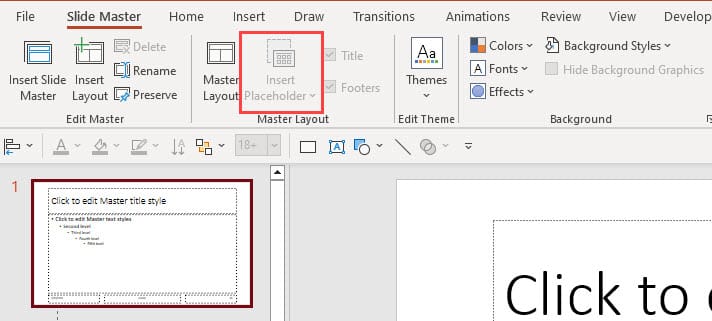
You can add normal shapes, lines, and textboxes to Layout #1, but not Placeholders; the option is greyed out:
In real life, you might add the company or client logo to Layout #1 – but it’s rare to repeat any other element in the same spot everywhere in the presentation.
A better approach is to create a few Layouts, such as 1-column and 2-column designs, and add “repeated elements” like the title/header/footer divider lines on each Layout.
The Problems with the PowerPoint Slide Master
The Slide Master is great for ensuring consistency, creating templates, and repeating common elements across the slides, but it does have some drawbacks.
First, not all formatting carries through to normal slides the way you necessarily want.
Similar to the copy/paste shape format commands, only the formats of the first line of text in a Placeholder are carried through to normal slides.
Second, many people do not know about the Slide Master or do not use it properly, and it is cumbersome to “convert” a long presentation with normal slides into one that uses Layouts consistently.
Third, an existing slide will not update even if you change the slide’s Layout within the Slide Master.
You can “reset” the slide to its base Layout using the Alt, H, Q shortcut, and this will update all the elements on the slide, including additions/deletions and edits you’ve made in the Slide Master.
However, you’ll also lose any additional formatting you have applied to the Placeholders on this normal slide.
Because of these downsides, it’s best to keep the Slide Master simple and use it for tasks like inserting logos, headers, footers, and slide numbers rather than complex layouts.
Setting Up the PowerPoint Slide Master Properly
If you’ve just created a new presentation and you want to use the Slide Master extensively, here’s what we recommend:
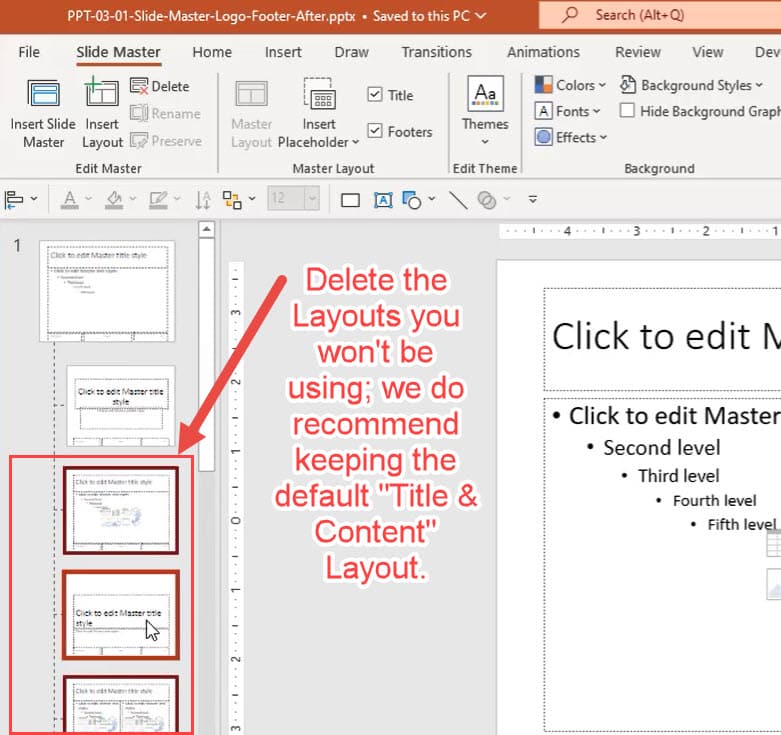
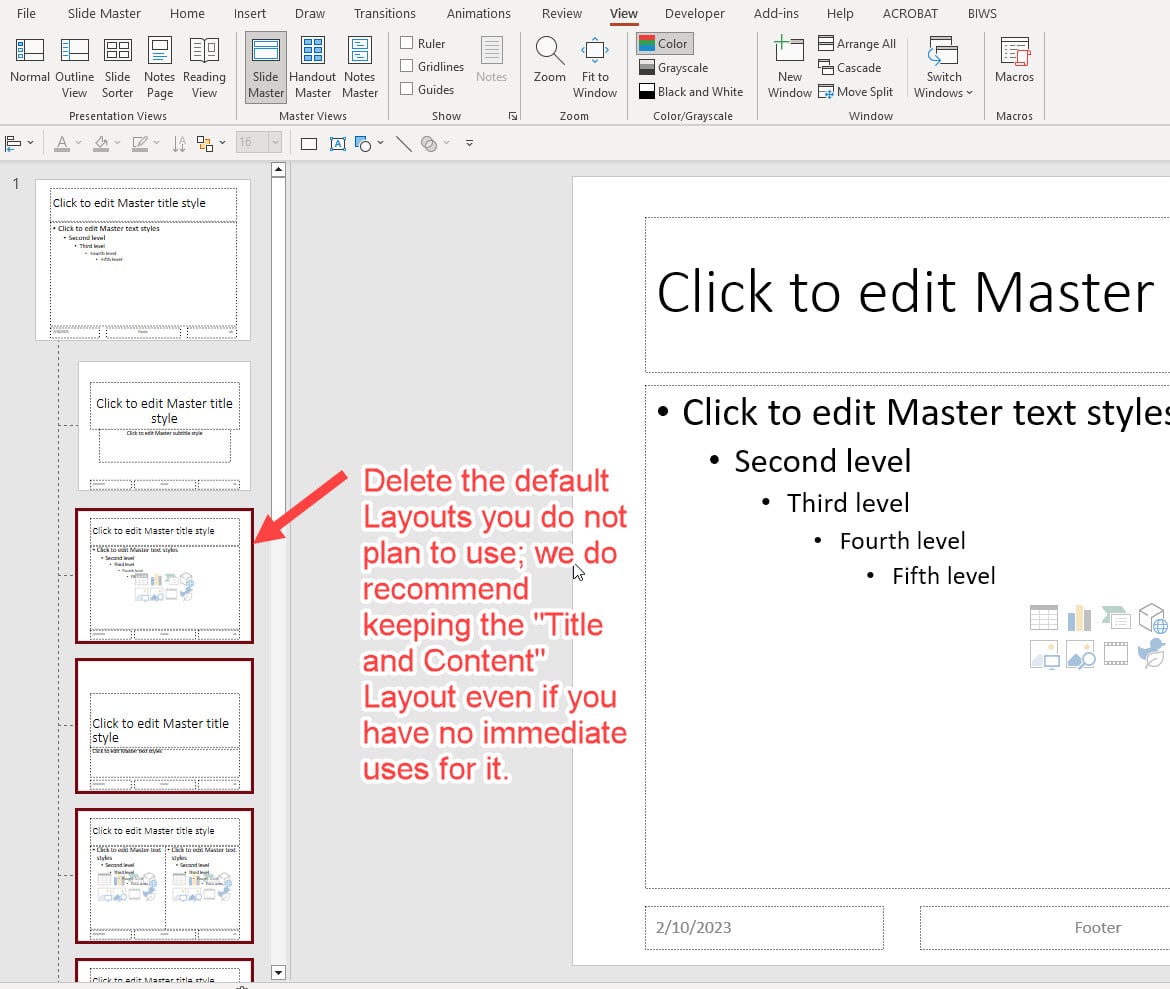
Step 1: First, go to the Slide Master with Alt, W, M (PC) or ⌘ + Opt + 1 (Mac) and delete the default Layouts you will not use.
We recommend keeping the “Title and Content” Layout – ignore the recommendation in the video – but everything else can go:
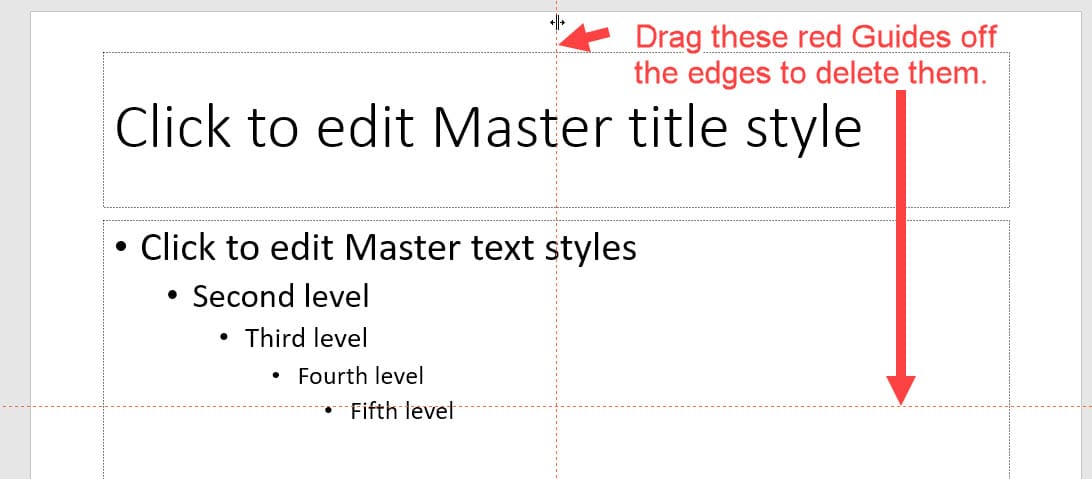
Step 2: We also recommend removing the Drawing Guides in the Slide Master because they’re separate from the Drawing Guides in the normal presentation, and you usually don’t need multiple sets of Guides.
To do this, enter the Slide Master and go to Layout #1 there (the “Office Theme Slide Master”).
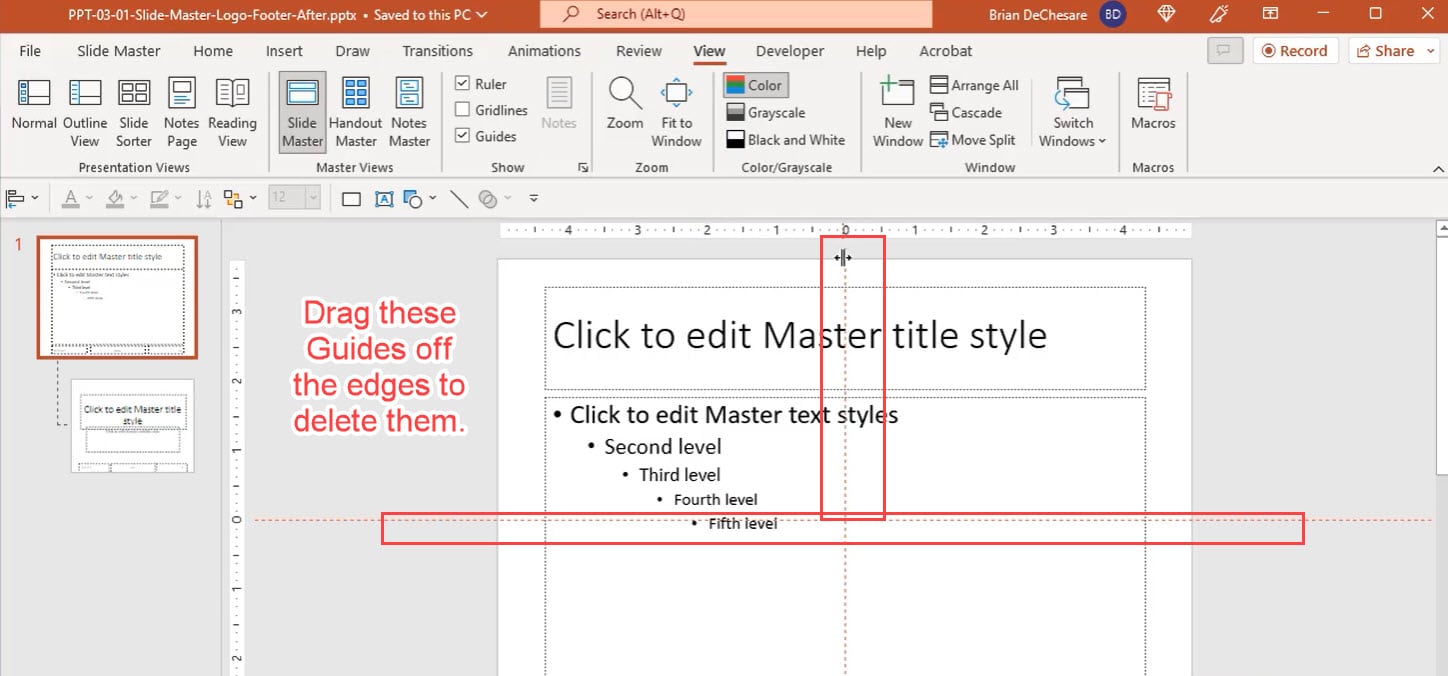
Press Alt, W, S (PC) or ⌘ + Opt + Ctrl + G (Mac) to show the Drawing Guides, which should appear in red, and drag them off the slide to remove them.
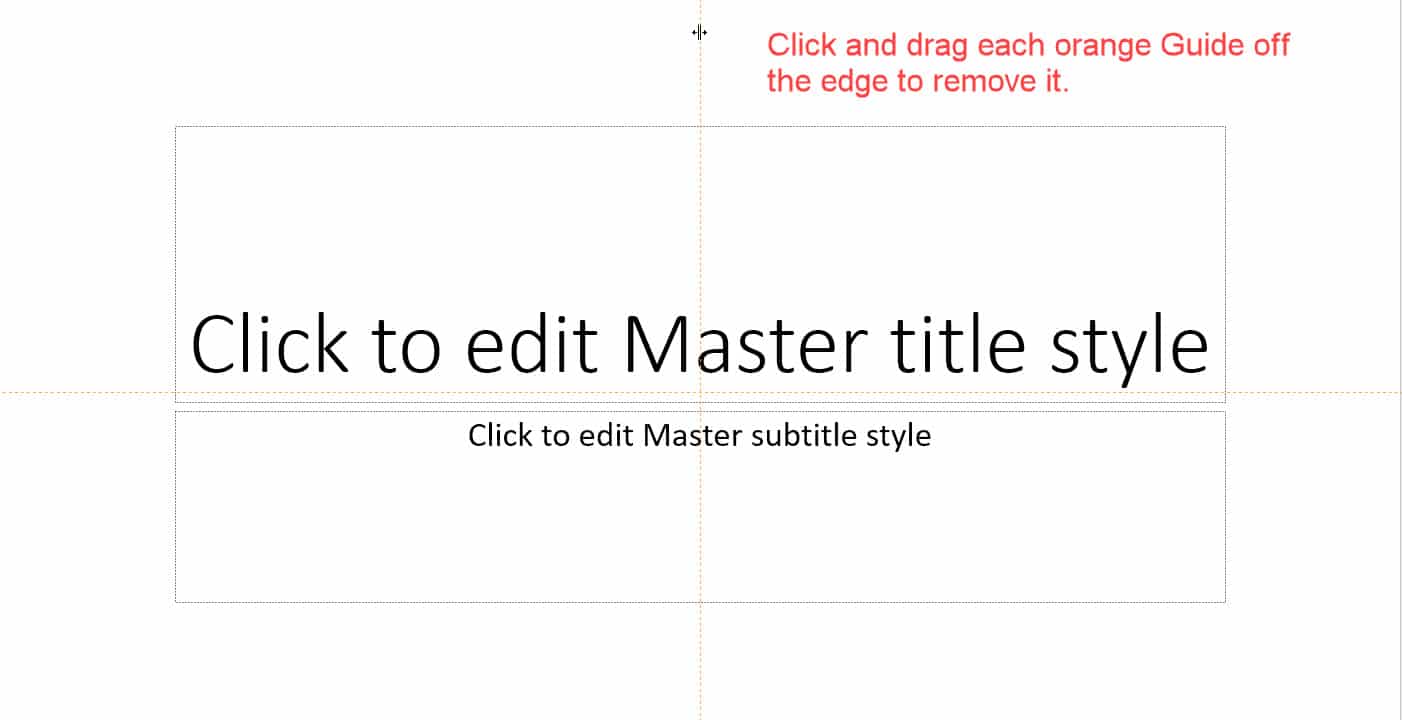
Next, go to each Layout you plan to use and do the same thing.
These Drawing Guides will appear in orange, and by default, they’ll be single vertical and horizontal lines.
We recommend removing these unless you plan to customize them for a more complex Layout in which specific alignments would be helpful:
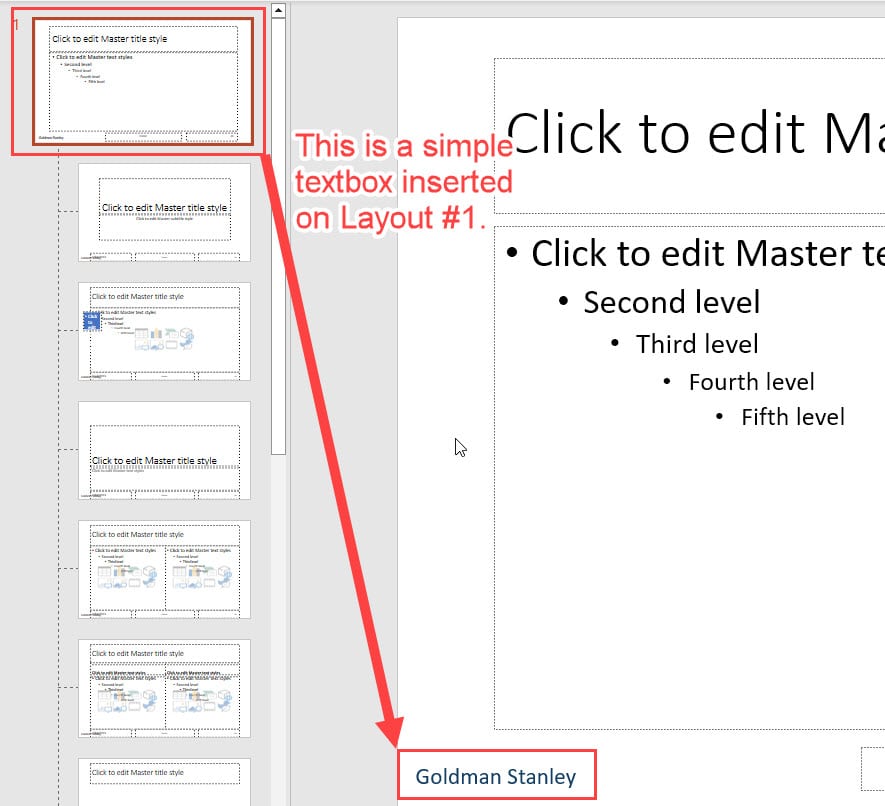
Step 3: Add the company logo, the slide number, and the header or footer elements that should appear on all slides on Layout #1.
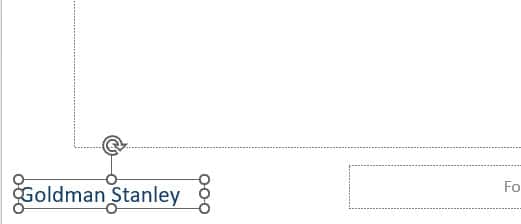
The logo is straightforward: insert a normal shape or textbox, format it appropriately, and drag it to the bottom left or right corner:
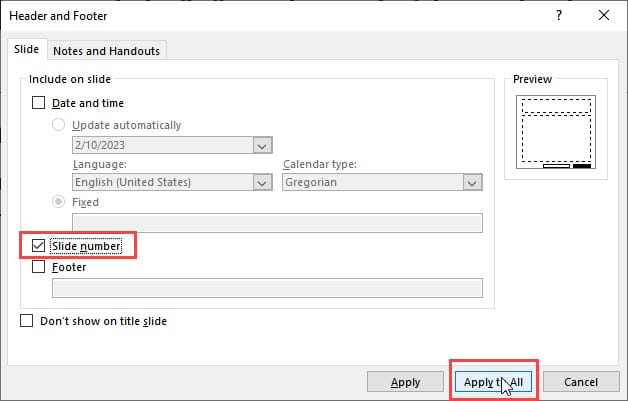
To add the slide numbers, press Alt, N, H (Insert –> Header & Footer on Mac) and make sure “Slide Number” is checked:
If you want to add something else in the header or footer, such as the client’s name or the project name, you can also do that at this stage.
But in most cases, elements like lines for the header and footer areas should be added directly on the custom Layouts because you usually don’t want to show these on the title slide or “section divider” slides.
Step 4: Set the default themes, colors, fonts, and background styles.
Within the Slide Master view, click the “Slide Master” tab and go to “Edit Theme” and “Background” to set these:
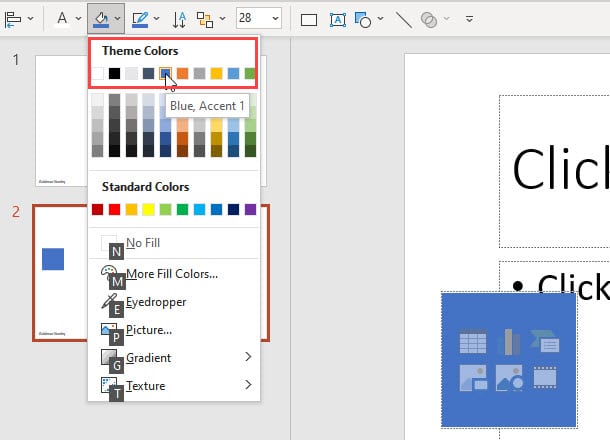
If you go to the normal slides and set the fill/font color of a shape or textbox, you can access all these theme colors easily:
The main benefit of this feature is that it lets you change all the colors in the presentation from within the Slide Master.
You just need to ensure that each shape, textbox, and line uses one of the “Theme Colors” you’ve selected.
If it does, you can return to this area of the Slide Master and change the colors here, and everything that uses one of these colors will update automatically.
Many companies have their own themes and color schemes, so you should follow your internal standards when doing this.
Practice Exercise: Create a Custom Layout in the Slide Master
Your task in this practice exercise is to start with the “Before” version of the file and modify it to set up the Slide Master properly, which means:
1) Remove the unused layouts.
2) Delete the unnecessary Drawing Guides.
3) Add the “Goldman Stanley” logo and the slide numbers.
4) Set the text and bullet styles on the first Layout in the Slide Master.
To save time, remember that you can copy and paste shapes, lines, and textboxes from normal slides into Layouts within the Slide Master.
Start by pressing Alt, W, M to enter the Slide Master and delete the unnecessary Layouts:
Then, press Alt, W, S and remove the unnecessary red Drawing Guides by dragging them off the edges:
Next, go to one of the normal slides with the “Goldman Stanley” logo at the bottom, copy the logo from that normal slide, and paste it into the bottom left corner of Layout #1 in the Slide Master:
Once you’ve done this, the “Goldman Stanley” logo will repeat on each slide, but all the existing slides have “duplicate logos” – because each one also had this logo as a separate shape!
So, you should go to each slide individually and delete the logo in its bottom-left corner:
You can press Alt, N, H to add the slide numbers in the footer, and you can format them as you want.
Make sure the slide number textbox in the bottom right corner is aligned properly to the right edge of the “main content area” on each slide (demonstrated in the video using extra lines).
Finally, as we do in the sample video, you can adjust the font sizes, bullet styles, and indentations on Layout #1.
These are standard PowerPoint commands/shortcuts not specifically related to the Slide Master.
More Advanced Features in the PowerPoint Slide Master
In our full PowerPoint Pro course, you’ll set up many slides and Layouts within the Slide Master, including ones for company profiles and the Table of Contents.
You’ll also get practice “retrofitting” existing slides to use Layouts.
Finally, in the VBA and macro module of the course, you’ll learn how to use Drawing Guides in the Slide Master to align and distribute shapes, and you’ll learn how to automatically generate a Table of Contents based on Layouts for the section markers.
The PowerPoint Slide Master will not solve every problem, but it could help you create presentations more quickly with fewer errors if you use it properly.

About Brian DeChesare
Brian DeChesare is the Founder of Mergers & Inquisitions and Breaking Into Wall Street. In his spare time, he enjoys lifting weights, running, traveling, obsessively watching TV shows, and defeating Sauron.
